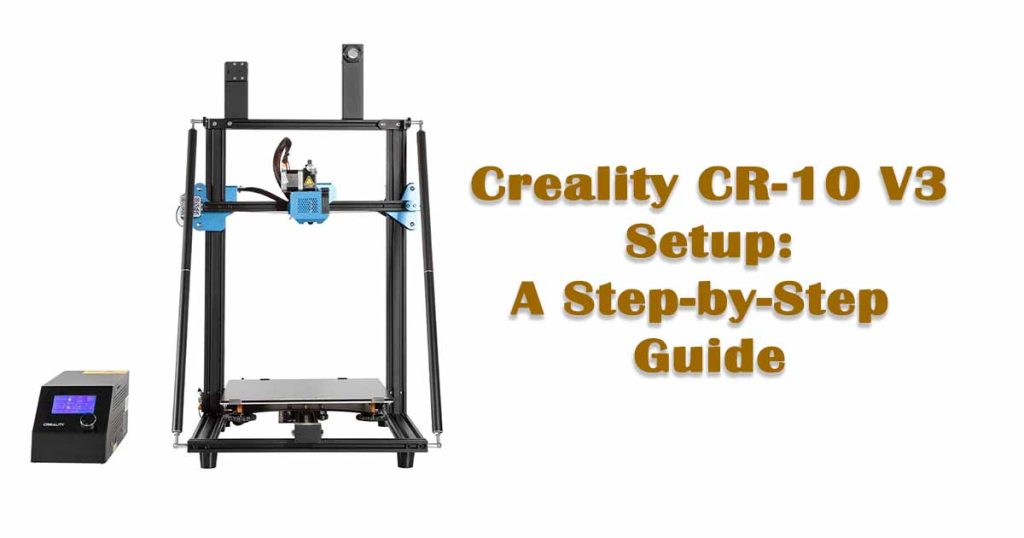
In the exciting world of 3D printing, the Creality CR-10 V3 stands out as a reliable and popular choice for both beginners and experienced makers. This versatile 3D printer offers a winning combination of affordability, ease of use, and impressive print quality.
However, like any piece of technology, getting started with the Creality CR-10 V3 can be a bit daunting, especially if you’re new to the world of 3D printing.
That’s where we come in. In this comprehensive guide, we will walk you through the setup process for the Creality CR-10 V3, ensuring that you have all the information you need to embark on your 3D printing journey with confidence.

From unboxing your new printer to calibrating it for optimal performance, we’ll cover every step in detail. You’ll learn about the printer’s key features, how to assemble it correctly, and how to troubleshoot common issues that may arise during setup.
Whether you’re eager to create intricate prototypes, functional parts, or artistic designs, the Creality CR-10 V3 has the potential to bring your 3D printing dreams to life, and we’re here to help you make that happen.
So, if you’re ready to dive into the world of 3D printing and unleash your creativity, join us as we demystify the Creality CR-10 V3 setup process and set you on the path to 3D printing success.
Unboxing and Initial Inspection
The excitement of unboxing a new 3D printer like the Creality CR-10 V3 is a moment every enthusiast eagerly anticipates. As you carefully open the packaging, you’re greeted with a sense of curiosity and wonder. The first step is to conduct a thorough initial inspection.
To start your 3D printing journey, it’s essential to verify the presence of all components, which include the printer itself, the filament spool, tools, and various accessories. A crucial step in this process is carefully inspecting the printer’s frame for any potential shipping-related issues, such as cracks or dents. These findings should be promptly reported to the seller. For a comprehensive guide on selecting the best Creality 3D printer and ensuring a smooth setup process, you can explore “Creality 3D Printing World,” where you’ll find valuable insights and reviews.
Inspect the printer’s hotend and build platform to make sure they are clean and undamaged. Take note of any loose or disconnected wires, as well as the condition of the print bed surface.
Finally, check that the instruction manual and software are included. This meticulous initial inspection sets the stage for a successful setup and ensures that your Creality CR-10 V3 is ready to bring your 3D printing dreams to life.
Preparing Your Workspace
Setting up your Creality CR-10 V3 3D printer begins with the essential step of preparing your workspace. A clean and organized area is crucial for a smooth and efficient printing experience. Ensure your workspace is well-ventilated to disperse any fumes from the printing materials.
Position your CR-10 V3 on a stable, level surface to prevent any wobbling during printing. Organize your tools, such as spatulas, pliers, and cleaning brushes, within arm’s reach for easy access. Invest in storage solutions for your filaments to maintain their quality.
Additionally, consider placing your 3D printer near a power source and a computer for convenient control and monitoring.
By taking the time to prepare your workspace meticulously, you’ll not only enhance the safety of your 3D printing endeavors but also streamline the overall setup process, allowing you to bring your creative visions to life effortlessly.
Assembling the Frame
When it comes to setting up the Creality CR-10 V3 3D printer, one crucial step that demands attention is “Assembling the Frame.” This pivotal stage lays the foundation for the printer’s stability and performance throughout its lifespan.
The CR-10 V3’s frame assembly process is designed to be user-friendly, with clear instructions and labeled components to simplify the task. Begin by carefully attaching the vertical frame beams to the base, ensuring they are securely tightened. Next, secure the horizontal beams to create a sturdy and rigid frame.
Properly aligning and leveling the frame is essential for accurate 3D printing results. Take your time during this step, double-checking all connections to avoid any wobbling or misalignment issues.
A well-assembled frame is the cornerstone of the Creality CR-10 V3’s printing capabilities, ensuring that your projects will be executed with precision and reliability.
Mounting the Print Bed
When embarking on the setup of the Creality CR-10 V3 3D printer, a crucial step that can significantly impact your printing success is mounting the print bed. The print bed serves as the foundation upon which your 3D creations will take shape, making its proper installation paramount.
Begin by ensuring the printer is powered off and cool to the touch. Then, carefully attach the print bed to the printer’s heated bed platform, making sure it’s securely fastened. Precision is key; level the bed using the provided tools or manually, guaranteeing that the print surface is perfectly parallel to the printer’s nozzle.
This meticulous process guarantees adhesion and optimal printing results, minimizing the risk of warping or misalignment. Taking the time to mount the print bed correctly sets the stage for a smoother 3D printing experience with the Creality CR-10 V3.
Installing the Filament Holder and Spool
When setting up your Creality CR-10 V3 3D printer, one crucial step to ensure smooth and hassle-free printing is installing the filament holder and spool. This seemingly simple task plays a pivotal role in the overall printing process.
Begin by locating the designated filament holder brackets on your printer’s frame, typically located at the top. Carefully attach the holder securely, ensuring it’s level and stable. Next, load your filament spool onto the holder’s rod, ensuring it rotates freely.
Properly installing the filament holder and spool is essential because it directly impacts the filament’s feeding mechanism, preventing jams and ensuring consistent material flow during printing.
Taking a moment to get this step right will save you from unnecessary headaches down the line, allowing you to enjoy a seamless 3D printing experience with your Creality CR-10 V3.
Connecting the Electronics
Connecting the electronics in your Creality CR-10 V3 3D printer setup is a pivotal step towards unleashing its full potential. This cutting-edge printer boasts impressive features, from a large build volume to precision engineering, but ensuring all the electronic components work seamlessly is crucial for successful prints.
Start by meticulously connecting the power supply, motherboard, and display screen, following the manufacturer’s instructions diligently. Pay close attention to the wiring, as any loose connections can lead to printing errors or even safety hazards.
Additionally, configuring the printer’s firmware and fine-tuning its settings can optimize performance. By mastering the art of connecting the electronics in your Creality CR-10 V3 setup, you unlock the gateway to a world of limitless creative possibilities, where your 3D printing projects come to life with precision and finesse.
Uploading Firmware and Software
When setting up your Creality CR-10 V3 3D printer, one crucial step that often gets overlooked is uploading firmware and software. This pivotal task ensures that your printer functions optimally and takes full advantage of its capabilities.
Uploading the latest firmware ensures that your printer operates with improved stability and performance, fixing any bugs or issues that may have existed in previous versions.
Additionally, installing the necessary software on your computer allows for seamless communication between your device and the CR-10 V3, making the printing process smoother and more efficient. Neglecting this step can lead to frustrating setbacks and compatibility problems.
So, before embarking on your 3D printing journey, take a moment to upload the firmware and software, ensuring a hassle-free and successful experience with your Creality CR-10 V3.
Calibrating the Printer
Calibrating the printer is a crucial step in the Creality CR-10 V3 setup process. Precision is the name of the game when it comes to 3D printing, and calibrating your printer ensures that your prints turn out as intended. Start by leveling the print bed to ensure uniform layer adhesion.
Then, fine-tune the extruder and hotend temperatures to match your chosen filament material. Adjusting the flow rate and print speed will help you achieve optimal print quality. Pay close attention to the first layer, as it sets the foundation for the entire print.
Utilize the printer’s built-in features and calibration tools, such as auto-leveling probes, to simplify this process. Taking the time to calibrate your Creality CR-10 V3 will result in consistent, high-quality prints that showcase the full potential of this impressive 3D printer.
Performing Test Prints
Performing test prints is a crucial step in the Creality CR-10 V3 setup process. Before diving into your ambitious 3D printing projects, it’s imperative to ensure that your printer is calibrated and functioning optimally.
Test prints serve as a litmus test for your machine’s capabilities, allowing you to detect any issues with bed leveling, nozzle alignment, or extruder performance. By initiating a test print, typically a simple geometric shape or calibration pattern, you can assess the quality of your machine’s output and make necessary adjustments.
This initial trial run not only helps in identifying potential problems but also serves as a confidence booster, assuring you that your Creality CR-10 V3 is primed and ready for the more intricate designs that lie ahead in your 3D printing journey.
Maintenance and Troubleshooting
Maintenance and troubleshooting are crucial aspects of ensuring the smooth operation of your Creality CR-10 V3 3D printer setup. Regular maintenance helps prolong the lifespan of your printer and ensures consistent print quality. Start by cleaning the print bed and nozzle regularly to prevent filament buildup.
Check for loose belts, screws, or wiring that might affect the printer’s stability and calibration. Troubleshooting involves identifying and addressing common issues like layer adhesion problems, filament jams, or calibration errors.
Utilize the printer’s user manual and online resources to troubleshoot and find solutions to these issues promptly. Regular maintenance and effective troubleshooting techniques are the keys to maximizing the performance and reliability of your Creality CR-10 V3 3D printer setup, ensuring your 3D printing projects are consistently successful.
Exploring Advanced Features
When delving into the world of 3D printing, the Creality CR-10 V3 stands out as a reliable choice. One aspect that sets it apart is its array of advanced features, making setup an exciting part of the journey. This printer offers auto-leveling, ensuring precise bed calibration with minimal effort.
Its silent motherboard technology reduces noise during operation, making it ideal for home use. The filament sensor prevents print interruptions due to material depletion, and the resume print function recovers projects in case of power outages.
Moreover, the CR-10 V3 boasts a sturdy frame and a direct drive extruder for improved print quality. Exploring these advanced features not only simplifies setup but also enhances the overall 3D printing experience, making the Creality CR-10 V3 a top choice for enthusiasts and professionals alike.
Conclusion
In conclusion, the Creality CR-10 V3 setup offers an impressive blend of innovation and simplicity that caters to both novice and experienced 3D printing enthusiasts. As we’ve explored in this article, the assembly process is remarkably straightforward, thanks to the detailed instructions and well-organized components.
Once assembled, the CR-10 V3’s notable features, such as its large build volume, silent stepper motor drivers, and robust frame, make it a formidable choice for a wide range of 3D printing projects. Its compatibility with a variety of filament materials and ease of use through the user-friendly touchscreen interface further enhance its appeal.
Moreover, the machine’s durability and reliability ensure that you can count on it to consistently deliver high-quality prints. With its competitive price point, the CR-10 V3 stands out as a valuable investment for makers, designers, and hobbyists looking to bring their creative visions to life through 3D printing.
Whether you’re crafting prototypes, functional parts, or intricate art pieces, the Creality CR-10 V3 is a powerful tool that can help you achieve your 3D printing goals with ease and precision.

